

SIP Integration
This guide explains how to integrate your Voice Agent with telephony systems using SIP to receive and make calls.
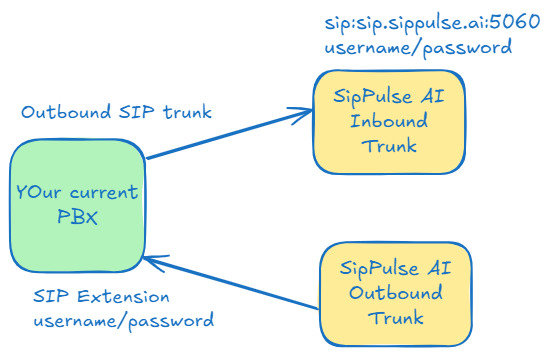
SipPulse AI allows SIP integration through its Proxy sip:sip.sippulse.ai:5060
Prerequisites
Before configuring SIP integration, make sure you have:
- A configured Voice Agent with LLM model and TTS voice defined
- Access to a telephony system (IP PBX, VoIP provider, or SIP trunk)
- Network permissions to connect to the SipPulse SIP server (port 5060 UDP/TCP)
- SIP permission enabled at the organization level — an Admin must enable the SIP feature for your organization before the inbound/outbound options become available
Tip
The simplest way to get started is using the SIP URI method for inbound calls, which requires no additional configuration on your PBX beyond a call forwarding rule.
Accessing SIP Configuration
To configure your agent's SIP integration:
- Navigate to Agents and select the desired agent
- Access the Deploy tab through the navigation menu
- Locate the SIP card and click Configure
The configuration is split into Inbound, Outbound, Numbers, and External registration tabs. The Inbound tab shows the agent's SIP URI first; that URI works without purchasing a phone number.
Phone numbers and billing
Use the Numbers tab only when the agent must also receive calls from the phone network:
- Review available numbers by area code and confirm the purchase. The monthly fee shown in the confirmation is charged immediately.
- The purchased number belongs to the organization, while its cost is attributed to the project of the agent for which the purchase was started.
- Select the number for the agent and click Save. The purchase is immediate; the agent link is completed only when the SIP configuration is saved.
The number inventory shows the linked agent, responsible project, last effective charge, and next billing date. Unlinking keeps the number purchased and assigned to its last project until it is linked to another agent. To return the number to the carrier and stop renewals, save the unlink first and then choose Release.
In the project dashboard, the initial purchase shows the purchasing user as the requestor. Renewals show System as the requestor and preserve Purchased by for auditing.
Receiving Calls (Inbound)
There are two ways to configure your agent to receive calls: via direct SIP URI or through External SIP Registration.
Method 1: Via SIP URI (Recommended)
This is the simplest form of integration. SipPulse AI provides a unique SIP URI for each agent that can be used as a call destination.
How it works:
- Enable "Inbound Calls" in the SIP configuration
- Copy the agent's SIP URI (displayed automatically)
- Configure your PBX to forward calls to this URI
The SIP URI follows the format:
{agent_id}@sip.sippulse.aiExample PBX configuration:
- Configure call forwarding from an extension to the SIP URI
- Or create an outbound trunk pointing to the agent's SIP URI
Passing Parameters to the Agent
To pass contextual information to the agent during inbound calls, you can use custom SIP headers. All headers must be Base64 encoded.
Supported SIP Headers
| Header | Behavior |
|---|---|
X-Additional-Instructions | Concatenates text to the agent's instructions |
X-Initial-Message | Replaces the agent's initial message |
X-Uid | Sets a custom unique identifier for the session |
X-Additional-Instructions
Passes contextual instructions that will be concatenated to the agent's existing instructions.
Example:
Original text:
The customer's name is John Smith and has an outstanding balance of $5,000.Base64 encoded value:
VGhlIGN1c3RvbWVyJ3MgbmFtZSBpcyBKb2huIFNtaXRoIGFuZCBoYXMgYW4gb3V0c3RhbmRpbmcgYmFsYW5jZSBvZiAkNSwwMDAuSIP header:
X-Additional-Instructions: VGhlIGN1c3RvbWVyJ3MgbmFtZSBpcyBKb2huIFNtaXRoIGFuZCBoYXMgYW4gb3V0c3RhbmRpbmcgYmFsYW5jZSBvZiAkNSwwMDAuX-Initial-Message
Replaces the initial message configured in the agent with a personalized greeting.
Example:
Original text:
Hello John! Welcome to SipPulse, how can I help you?SIP header:
X-Initial-Message: SGVsbG8gSm9obiEgV2VsY29tZSB0byBTaXBQdWxzZSwgaG93IGNhbiBJIGhlbHAgeW91Pw==X-Uid
Sets a custom unique identifier for the session. Useful for:
- Linking the call to a ticket or case number in your system
- Integration with CRMs and customer service systems
- Easily finding the call record in history
Example:
Original text:
ticket-12345-johnSIP header:
X-Uid: dGlja2V0LTEyMzQ1LWpvaG4=Method 2: External SIP Registration
Beta Feature
External SIP Registration is currently in beta and only available for selected organizations. If you don't see the "Enable External Registration" toggle in your SIP configuration, this feature is not yet enabled for your organization. Contact support@sippulse.com to request access.
External SIP Registration allows SipPulse AI to register as an extension on an external SIP server (your PBX, VoIP provider, etc.).
When to Use
Use External SIP Registration when:
- You have an existing SIP/VoIP provider and want to receive calls through it
- Your PBX doesn't support redirecting (call forwarding) to external URIs
- You want the agent to appear as an extension in your phone system
- You need bidirectional integration with a specific SIP trunk
Configuring External Registration
- In the SIP configuration, enable Inbound Calls
- Activate the Enable External Registration toggle
- Fill in the fields:
| Field | Description | Example |
|---|---|---|
| SIP Server | External SIP server address | sip.provider.com or sip.provider.com:5060 |
| Username | Username for authentication | extension_100 or ai_agent |
| Password | Password for SIP server authentication | SecurePassword123! |
- Click Save to apply the settings
Reuse Outbound details
If the Outbound tab uses the same provider and contains a server, username, and password, choose Copy Outbound details. This copies the three fields once, replaces the External registration values, and is only applied after you click Save.
Provider Requirements
Make sure your SIP provider allows external registrations and that the provided credentials have permission to receive calls. Some providers may require additional firewall configuration or IP whitelisting.
Making Calls (Outbound)
To make outbound calls through your agent, you need to configure an outbound SIP trunk.
Configuring the Outbound Trunk
The easiest way to configure an outbound trunk is to connect it to an existing SIP extension on your PBX. Check with your PBX administrator if it's possible to connect for outbound calls.
Warning
We strongly recommend disabling international calls on the extension used to prevent fraud.
In the SIP configuration, enable Outbound Calls and fill in:
| Field | Description | Example |
|---|---|---|
| Address | Hostname or IP of your SIP trunk | pbx.yourcompany.com:5060 |
| Phone Numbers | Numbers that can be used as caller ID | +15551234567 |
| Username | Username for authentication (if required) | sip_extension_101 |
| Password | Password for authentication | ExtPassword!2345 |
Complete configuration example:
Address: pbx.companyabc.com:5060
Numbers: +15551234567
Username: ext_101
Password: SecurePassword123!
Testing via Playground
After configuring the outbound trunk, you can test by making a call directly through the interface:
- On the Deployments page, locate the SIP card
- Click the phone button (or Make Call)
- Enter the destination number in E.164 format (e.g.,
+15551234567) - Optionally, enable "Customize this call" to override settings
- Click Start call
Via API
The outbound SIP trunk can be triggered via RESTful API:
POST https://api.sippulse.ai/agents/{id}/outbound-callWhere {id} is the unique identifier of your Voice Agent.
Request body:
{
  "phone_number": "+15551234567",
  "metadata_overrides": {}
}
Parameters:
phone_number: The phone number to call in E.164 formatmetadata_overrides: JSON object with settings to override the agent's configuration
Errors:
400 Bad Request: the request or outbound trunk configuration is invalid.502 Bad Gateway: the request was valid, but the LiveKit/SIP hop failed. A recognized SIP rejection returnssip_invite_failedwithdetails.sipStatusanddetails.sipReason:
{
  "error": {
    "statusCode": 502,
    "code": "sip_invite_failed",
    "message": "Outbound call was rejected by the SIP network",
    "details": {
      "sipStatus": 603,
      "sipReason": "Decline"
    }
  }
}
About Overrides
The metadata_overrides works as an override: you only need to include the fields you want to change. Fields not included use the agent's default configuration; an empty value explicitly replaces that default.
Voice tools (end_dialog, transfer_call, send_dtmf, receive_dtmf) are not part of metadata_overrides - they are configured on the agent itself and apply to every call it makes. If a call needs different tool behavior, use an agent configured for that behavior instead of trying to override it per call.
Complete metadata_overrides Example
{
    "phone_number": "+15551234567",
    "metadata_overrides": {
        "initial_message": "Hello! How can I help you today?",
        "additional_instructions": "customer_name: John",
        "variables": {},
        "inactivity_timeout": {
            "enabled": true,
            "time_in_seconds": 30,
            "message": "Due to inactivity, I will end our conversation now. Thank you very much and goodbye!",
            "presence_attempts": 0,
            "presence_message": "Are you still there?"
        },
        "max_duration": {
            "time_in_minutes": 60,
            "message": "Our conversation time has reached its limit. It was a pleasure helping you. Until next time!"
        },
        "ambient_sound": {
            "enabled": false,
            "audio": "ambient_1",
            "volume": 0.3
        },
        "thinking_sound": {
            "enabled": true,
            "audio": "thinking_1",
            "volume": 0.3
        }
    }
}
Tip
An interesting hack to discover the correct metadata_overrides format is to use the browser console's Network tab and observe the payload sent by the Playground. This allows you to know exactly how to format the payload when calling the API.
For complete API documentation, visit: API Explorer
Phone Numbers (DIDs)
SIP Configuration organizes the flow into Inbound, Outbound (when included in the plan), Numbers, and External registration tabs. On desktop, navigation is displayed in a sidebar; on smaller screens, it becomes a horizontal strip. The Save button applies changes from every tab. If another tab contains an invalid field, that tab is highlighted and opened automatically when you try to save.
The workspace opens on Inbound. After you save with Inbound enabled, the displayed SIP URI receives calls automatically and does not require purchasing a phone number. Use Numbers only when the agent also needs to receive calls from the phone network through a DID.
What is a DID?
DIDs (Direct Inward Dialing) allow you to associate a specific phone number with your agent. When configured:
- Inbound calls: The system automatically identifies which agent should answer based on the dialed DID
- Outbound calls: The DID can be used as the caller ID
Purchasing a number
You can use a manual number registered by an administrator or purchase a new Brazilian number:
- Open SIP Configuration and go to the Numbers tab
- Under Purchase a new number, select a two-digit Area code (DDD)
- Review availability, the monthly fee, and the billing rule
- Choose Purchase and select for {price}/month and confirm the charge
- Click Save to finish linking the new number to the agent
This first version offers numbers only in Brazil. Search uses only the area code supplied by the carrier. The interface shows a preview of the current pool, but the carrier selects the exact number during purchase. The first charge is generated as soon as the carrier confirms the purchase and may take a few minutes to appear in billing history; subsequent charges are due on the allocation anniversary. A renewal that is already due is debited in full, even when it exceeds the organization's credit limit, and raises an alert — the number is not automatically suspended or released. If the plan has no monthly price configured, purchasing is unavailable.
Purchasing does not save the configuration
Purchasing has an immediate financial effect. The new DID is automatically selected in the form, but the link to the agent is only persisted after you click Save.
Assigning the number to an agent
- Open the agent's SIP Configuration
- On the Numbers tab, find a free number under Organization numbers and choose Link to this agent
- Click Save
Exclusive DIDs
Each DID can only be associated with one agent at a time. DIDs already in use by other agents appear disabled with an indication of which agent is using them. To switch a DID between agents, first remove it from the current agent.
Releasing a number
On the Numbers tab, use Release in the Organization numbers list. An assigned DID must first be unassigned and the configuration saved. Release is requested immediately and does not wait for overdue charges; new renewals remain paused while the carrier reconciles an uncertain response. If the carrier still holds the number, the attempt is marked as failed and the billing schedule resumes, without automatically repeating the release. Releasing returns the number to the available pool and does not refund the paid billing period.
Voice Tools for SIP Calls
SIP calls support specialized voice tools for advanced call handling that aren't available in other channels like Voice Playground or WhatsApp.
Available Tools
| Tool | Description |
|---|---|
| End Dialog | Gracefully end calls when the conversation is complete |
| Transfer Call | Transfer calls to other SIP destinations (human agents, departments) |
| Send DTMF | Send DTMF tones to navigate external IVR menus |
| Receive DTMF | Collect DTMF input from callers (CPF, PIN codes, account numbers) |
Configuration
Voice tools are configured in Agent Configuration > Call Configuration > Tools. Each tool can be individually enabled and customized with descriptions that guide the LLM on when and how to use them.
TIP
For detailed documentation on each voice tool including configuration options, LLM parameters, and best practices, see Voice Call Tools.
DTMF Collection Use Case
A common use case for SIP voice tools is collecting sensitive information via DTMF:
- Agent prompts user: "Please enter your 11-digit CPF using the phone keypad"
- User enters digits: Types CPF on their phone
- Agent confirms: "I received 1-2-3-4-5-6-7-8-9-0-1. Is this correct?"
- User confirms: "Yes"
- Agent proceeds: Uses the confirmed CPF for the transaction
Testing Limitation
DTMF tools cannot be tested in Voice Playground. You must test with actual SIP calls to verify DTMF collection functionality.